In the aerospace industry, ensuring the integrity of aircraft components, especially wheels that endure extreme operating conditions, is crucial. Traditional inspection methods, often relying on sampling, fall short in detecting early-stage damage. To address this, Part-to-Itself (PTI) has emerged as a groundbreaking solution, offering unparalleled sensitivity and precision.
Understanding PTI: A New Approach in Maintenance Repair & Overhaul (MRO)
PTI is a precision inspection method that tracks the resonance profile of individual components over time. By comparing subsequent measurements to the initial baseline, we can identify even subtle changes indicative of potential damage, such as cracks, before they escalate into critical failures. The underlying technology is supported by our patented methods (EU: 2630437, US: 10481104, 10718723 and others), ensuring the highest level of accuracy and reliability in inspection.
The general PTI approach in MRO involves measuring the part during one visit, then re-measuring it during subsequent visits to verify that it hasn’t changed “too much” compared to other parts. This method has proven to be the most sensitive mode of Process Compensated Resonance Testing (PCRT), as it can see through part-to-part variation and detect when a specific serial number part starts to change, accumulate damage, propagate a crack, build or release residual stress, erode, or change dimension.
How PTI Works
The PTI process involves several key steps:
Step 1) Establishing a Baseline (Birth Certificate) Resonance Profile: For each wheel, we establish an initial baseline resonance profile. This can be when it first comes from the manufacturer or at the “first MRO point”
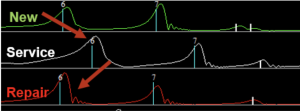
 Figure 1 Illustration of how the resonance spectra may change from the birth certificate baseline as the part goes into service and receives various repair or overhaul operations. In this example, the resonance peaks shift higher as a result of the service interval, and are restored by the repair to ‘near new state’. Quantification, comparison and analysis of these changes over the service life of a part offers new opportunities to life management.
Step 2) Regular Comparisons: Subsequent measurements are regularly compared to this baseline.
Step 3) Identifying Shifts: Significant resonance shifts are identified for further investigation.
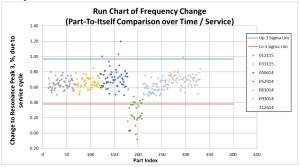
 Figure 2 In this graph, each set of colored dots represents a different set of turbine blades, with PTI data comparing the parts before and after a service interval. This type of PCRT PTI analysis allows detection of individual parts that might be changing more than others (blue or grey dots outside of the expected limits). It also allows detection of whole sets of parts (green dots) that might be aging or performing differently than other sets.
Step 4) Integration with Other Methods: PTI findings are corroborated by other inspection methods such as Eddy Current, Penetrant, and Visual Inspection. However, PCRT and PTI are fully automated, removing the potential for human error and allowing valuable NDT resources to focus on the highest risk components.
Real-World Impact: Case Study on Wheels
Our extensive experience with PTI, involving measurements of over 60,000 wheels, has yielded remarkable results. In this population, we have over 1,000 PTI pairs (pairs of measurements of the same wheel). We have seen many cases where the wheel shows no significant change, indicating it remains in good condition. However, we have also identified instances where significant resonance changes were detected. These findings were often supported by the detection of cracks through other methods, proving the efficacy of PTI.
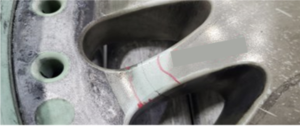
 Figure 3 Wheel spoke crack detected by PCRT PTI inspection.
For example, we detected spoke cracks in two outboard wheels. These parts were measured with PCRT by the MRO site before and after a service interval. (Note that the measurements did not need to be taken at the same MRO location. This highlights the flexibility of PTI, as comparisons can be made regardless of inspection site.) Similar detectable PTI changes were observed in the same peaks for both wheels after cracking, validating the sensitivity and reliability of this method
 Figure 4 – 3 wheels (B, C, D) were each measured twice with at least 9 months between measurements. Wheel B’s resonance data shows very little change over this interval. However, wheels C and D, both of which were confirmed to have spoke cracks by further NDT, show significant change, due to the initiation/propagation of the damage. The peak labeled 10 shifts lower in frequency as a result of the crack, and the spacing/pattern of peaks at peaks 11-12 changes noticeably as well.
Beyond Wheels: Expanding PTI Applications
While PTI has proven invaluable in wheel inspection, its potential extends far beyond. By meticulously tracking individual component histories, PTI can revolutionize the maintenance and inspection of various aircraft parts. Adhering to ASTM E3213 standards, this method excels in identifying subtle changes that may signal impending issues.
Specifically, PTI can be applied to other critical components such as landing gear components, blades, disks, and even serialized fasteners. By comparing each part to its own historical data, rather than population averages, PTI offers unparalleled sensitivity in detecting anomalies.
A particularly promising application lies in the realm of life-limited parts. Traditionally, these components are replaced based on predictive models, often leading to the premature disposal of perfectly serviceable parts. PTI has the potential to change this paradigm by providing real-time data on a part’s condition. Through continuous monitoring, we can identify parts that are degrading prematurely while also extending the life of those performing as expected. This not only enhances safety but also delivers significant cost savings.
By expanding the use of PTI, we can usher in a new era of predictive maintenance, optimizing aircraft performance and reducing downtime.
The Future of Inspection: Continuous Improvement
We are currently testing a PTI sort on a specific wheel part number in a process termed a “CHAIN.” Quickly testing with various types of sorts provides multiple layers of risk mitigation:
- Outlier Screening Sort: Identifies parts that deviate significantly from the norm.
- Targeted Defect Sort: Although not as sensitive as PTI, it helps in identifying specific defects.
- PTI Sort: Identifies parts changing differently than other parts under similar conditions, providing the first indications of damage.
Our ongoing research and development efforts aim to expand PTI’s capabilities and applications. By combining PTI with other advanced inspection methods, we are building a robust framework for ensuring aircraft safety.
Key Benefits of PTI
- Early Detection of Damage: Identifies potential issues before they escalate.
- Improved Safety and Reliability: Ensures the integrity of critical components.
- Reduced Maintenance Costs: Prevents costly repairs by catching problems early.
- Increased Aircraft Availability: Minimizes downtime due to unexpected failures.
By adopting PTI, airlines and MRO providers can significantly enhance their inspection processes, ensuring the continued airworthiness of their fleets.
Get in Touch
To learn more about how PTI can revolutionize your inspection processes, contact us today for a consultation.


